Search This Blog

Wednesday, May 18, 2016

Cisco Nexus RADIUS authentication

How to configure Cisco Nexus switch with RADIUS authentication?

Here I’m using Microsoft NPS (Network Policy Server), which is feature of Windows 2008 R2 server, as RADIUS.

The switch is Nexus 93128TX running NX-OS version 6.1(2)I3(3a)

The first thing to do is to check with which IP address the switch accesses the NPS and that it’s reachable.

In this example the IP address of the NPS is 192.168.10.222 and the switch management IP is 192.168.10.230.

Now let’s configure the Nexus switch for RADIUS authentication:

radius-server host 192.168.10.222 key <PRE-SHARED_KEY> auth-port 1645 acct-port 1646 authentication accounting
!
aaa group server radius RADIUS
    server 192.168.10.222
!
aaa authentication login default group RADIUS
aaa authentication login console local

The default behavior of the Nexus in case of all AAA servers configured for remote authentication are unreachable is fallback to local.

Before we will continue to configure the NPS create security group, on the AD, which will gain access to the switch.

We can create 2 different groups for example – one for network-admin role and the other for vdc-operator with read-only permissions.

We also can create specific roles on the Nexus switch (see notes below).

Next let’s configure the NPS:

Open the NPS console

Click the ‘+’ next to RADIUS Clients and Servers

Right click on RADIUS Clients and select New

Type in a friendly name for the device, type the IP address of the device and the pre-shared key


Click on the Advanced tab

From the Vendor name down-drop menu select Cisco


Click OK

Click the ‘+’ next to Policies

Right click on Network Policies and select New

Type in a Policy name


Click Next

Under Specify Conditions click Add

Scroll down and select Client IPv4 Address, type in the switch IP address and click OK

*This allows us to tie this specific access policy to this specific device


Now click on Add again and select User Groups and select the appropriate group for accessing the switch.


Click Next

On the Specify Access Permissions make sure the Access granted is selected and click Next


On the Configure Authentication Methods, uncheck all and check only Unencrypted authentication (PAP, SPAP)


On the Configure Constraints we can configure various options or just click Next


On the Configure Settings, select Vendor Specific and click Add


From the Vendor drop-down menu select Cisco, click on Cisco-AV-Pair and click Add


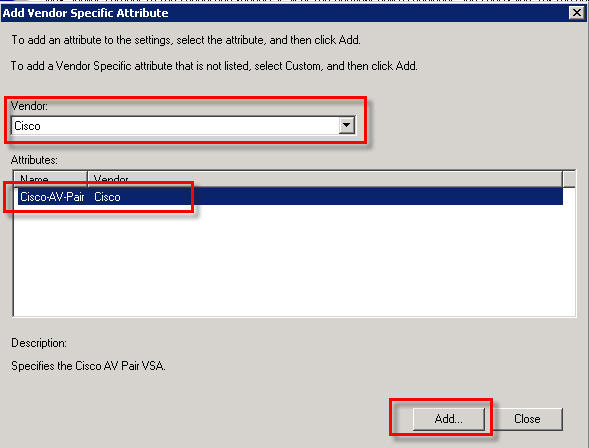
Click Add and type in the following attribute:
shell:roles="network-operator vdc-admin"


This will assign network-operator and vdc-admin for the login user, We can change the roles according to our requirements for the specific account/group.

Click OK, Next and Finish.

Now you can try to login into the Nexus switch with your domain account.

Notes

Show roles on the switch:

RHA-DC-NX-SW-01#  show role

Configure new role on the switch:

configure terminal
role name <ROLE_NAME>
rule number {deny | permit} command command-string
rule number {deny | permit} {read | read-write}
rule number {deny | permit} {read | read-write} feature feature-name
rule number {deny | permit} {read | read-write} feature-group group-name
description text
exit

Validate new role:

show role
show role {pending | pending-diff}
role commit
copy running-config startup-config

Now you can use the exactly role name under  Cisco-AV-pair attribute for applying this role to specific account/group.


Wednesday, May 11, 2016

How to configure Check Point SmartDashboard for RADIUS authentication

In my previous post I demonstrate how to configure Check Point GAIA OS for RADIUS authentication, in this post I will show how to configure Check Point SmartDashboard for RADIUS authentication.

First we will have to configure a RADIUS client, on the NPS, for the security management:

Open the NPS console

Click on RADIUS Clients and Servers

Right click on RADIUS Clients and select New

Type in the name of the device

Type in the IP address of the device,

Note that this is the IP address that the device will use for reaching the RADIUS server according to the routing table, FW policy, NAT etc.

Type in a shared secret


Click on the Advanced tab and under vendor name make sure you select RADIUS Standard


Click OK

Now let’s configure Check Point SmartDashboard

Log in into SmartDashboard, and on the object menu select Servers and OPSEC
Click on the ‘+’ sign near to Servers, right click on RADIUS and click on New RADIUS


Type in the server name, select the host (create a new object for this server if necessary) and type in the shared secret (the one that we have configured in the NPS server)


Click OK

Now right click on RADIUS Group and select New RADIUS Group


Type in the group name and add the newly created RADIUS server to this group


Click OK

You will probably configure more than one RADIUS server so it’s easier to work with group object rather with single objects.

Click on Users and Administrators, right click on Administrators and click on New Administrator


For each user that you want to allow to login into the SmartDashboard, using his AD account, you will have to configure administrator account with the appropriate permission profile on the SmartDashboard.

On the General Properties type in the login username, exactly as it’s appear in the AD, under User Name and select the required permission profile.

Note that the permission profile allow you to assign the required access permissions per-account and you can configure new profiles with more granular permissions.


Select Authentication, choose on the Authentication Scheme RADIUS and select the newly created RADIUS group.


Click OK

Now logout from the SmartDashboard and try your new settings by login with your AD account.

After you managed to login into the SmartDashboard with your AD account I’m highly recommend to change the admin password to something very complex and hard, keep it on password vault and never use it again else needed.

This can be done by login into the SmartDashboard with the admin account and click on the tool menu, select Manage and click on Change My Password…


How to configure Check Point GAIA for RADIUS authentication

RADIUS server: Windows 2008 R2 server with NPS (Network Policy Server)

Before we start to configure the NPS, please configure 2 security groups on your AD, the first for read-write access type users and the other for read-only access type users.

Open the NPS console

Click on RADIUS Clients and Servers

Right click on RADIUS Clients and select New

Type in the name of the device

Type in the IP address of the device,

Note that this is the IP address that the device will use for reaching the RADIUS server according to the routing table, FW policy, NAT etc.

Type in a shared secret


Click on the Advanced tab and under vendor name make sure you select RADIUS Standard


Click OK

Click on Policies

Right click on Network Policies and select New

We will have to create 2 new different policies, one for read-only access and the other for read-write policy.

Type in the policy name and click Next


On the Specify Conditions page click on Add and select Windows Groups


Select the read-write security group and click OK


Click Next

Make sure Access granted is selected and click Next


Check CHAP and PAP and click Next


On the Configured Constraints you can enable idle and session timeout


Click Next

On Configure Settings, select RADIUS Attributes -> Vendor Specific, and click Add


Select Vendor-Specific from the list and click Add


Click Add, select Enter Vendor Code, and type in 2620

Select Yes, It conforms

Click on Configure Attributes


On Vendor-assigned attribute number type 229

On Attribute format select String

On Attribute value type in radius-group-RW


Click OK, OK, OK and Close

Click Next and then Finish

Make sure the newly created policy is above the deny policies, by right click on the policy and select Move Up. Also make sure that following the condition we made there is no other policy which will take precedence over this one, else move it above it.


Repeat these steps and create one more policy for read-only access, give it appropriate name, and on the Configure Conditions -> Windows group select the RO group, and on Configure Attributes -> Attribute value change it to radius-group-RO.

Again make sure this policy is above the deny policies.

Now let’s configure the GAIA OS, log in into the web GUI

Select User Management -> Roles and click Add

In the Role Name type in radius-group-RW

Select on the Features list the required access (for adminRole select all items)

In Mark selected as choose Read/Write and click OK


Repeat these steps and create new role named radius-group-RO, select the appropriate items/features according to the access type you need to grant to read-only users, and select read-only for those items.

Next select User Management -> Authentication Servers and click Add
On Host type in your RADIUS server IP address

Type in the shared secret (the one that we used in NPS -> Network Device)

Click OK and then Apply


That’s it! 

Now log out from the web GUI and test your settings by login again using your domain username and password (note that your domain account should be a member of the security group for firewall RO or RW access)

After that I highly recommend to change the admin password to something very complex and hard, keep it on password vault and never use it again else needed.
On my next post I will show how to configure RADIUS authentication for SmartConsole access.


Thursday, May 5, 2016

How to calculate the log rate on Check Point

In order to check the required disk size for Check Point log file we can calculate for a certain period of time the growth, in bytes per second, of the log file and with this value to calculate the required space.

This is done on the Security Management or the log server.

And this is how it done:

Go to log directory:

cd $FWDIR/log

Check the size of the file fw.logptr (SIZE_BEFORE):

ls fw.logptr

Wait for a period of time (SLEEP_TIME)

Check the size of the file again (SIZE_AFTER)

Then use the following formula to get the bytes per second rate:

RATE = ( SIZE_AFTER - SIZE_BEFORE ) / ( 4 * SLEEP_TIME )

Here is a sample bash script to automate this calculation:

Create directory on /home called scripts:

mkdir /home/scripts

Create new file on this directory:

vi /home/scripts/LogRateCalc

Copy this script into the newly created file:

#!/bin/sh
# Print log rate data on Security Management
echo "Check Point Log rate calculation"
echo " "
echo "Enter the required period of time (in seconds) to calculate the rate:"
read t1
echo " "
echo "Started at $(/bin/date +%d-%b-%Y_%Hh-%Mm-%Ss)" | tee -a /home/scripts/LogRateInfo
echo "Pleasse wait for" $t1 "seconds..."
SLEEP_TIME=$t1
SIZE_BEFORE=$(ls -l $FWDIR/log/fw.logptr | awk '{print $5}') ; sleep $SLEEP_TIME ; SIZE_AFTER=$(ls -l $FWDIR/log/fw.logptr | awk '{print $5}')
RATE=`expr \( $SIZE_AFTER - $SIZE_BEFORE \) \/ \( 4 \* $SLEEP_TIME \)`
echo "the log rate for this management unit is:"
echo "$RATE bytes per second" | tee -a /home/scripts/LogRateInfo
STR=`expr \( $RATE \* 60 \) \* 60 \* 24 \/ 1024 \/ 1024`
echo " "
echo "You will need $STR MB per day"
echo "Finished at $(/bin/date +%d-%b-%Y_%Hh-%Mm-%Ss)" | tee -a /home/scripts/LogRateInfo
exit 0

Save it, and change the file mode:

chmod 775 /home/scripts/LogRateCalc

Execute the script:

./home/scripts/LogRateCalc


Note that this script will also create a file under /home/scripts, called LogRateInfo, and will document any log rate check along with start and end time and date.